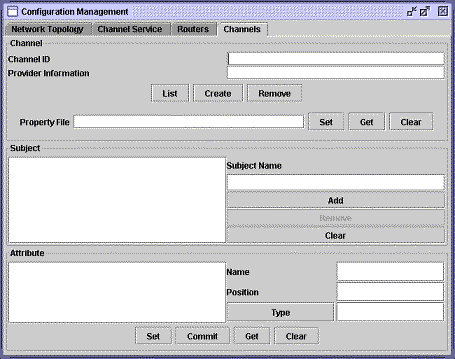
Channels
— the namespace for subjects and attributes
Channels are a namespace for subjects; content within a channel is organized by subject. Each channel has characteristic attributes.
Proxy connections to NetInjector access channels. The event agent, after opening a proxy connection to a channel, publishes and subscribes to the data stream within the channel.
The Channel interface of the PreCache NetInjector Administration exposes the data structure for each channel. This data structure should be designed with the event agent application developer.
Channel Information
The configuration of the channel and its subjects must conform to the conventions of the application design for notifications. So, too, the application must conform to the data structure for the channel, as created within the Channels interface.
Create a channel
Before creating a channel, you will need to know the following:
- Channel ID —
- a numeric token for the channel, assigned by the administrator
- Provider Information —
- comments about the data provider
- Enter a unique ID for the Channel.
- Add Provider Information.
- Click Create to add the Channel.
Subjects
Each category of information within a channel is a subject. Subjects may have subcategories. A Hobby channel could have many subjects:
- reading
- arts and crafts
- gardening
- woodworking
- music
- collecting
A particular subject would be represented within the channel as a set of subjects and subcategories:
- woodworking
- woodworking.projects
- woodworking.projects.interior
- woodworking.projects.exterior
- woodworking.wood
- woodworking.wood.hardwood
- woodworking.wood.softwood
The richness of each channel depends on the proper design of the subjects within the channel. This aspect of your topology should be carefully designed before committing the changes to the network.
Create a subject
Following your naming conventions for subjects, you can create subjects for your channel.
- Subject —
- a category of content
- Subject Name —
- the name of the subject, used to identify the subject and its subcategories
To create a subject:
- Enter a Subject name.
- Click Add to include the subject in the channel.
- Add subcategories, as needed.
- subject.subcategory.subsubcategory
- The subject will be available when you Commit your work.
Attributes
Each channel has certain common attributes. The attributes defined at this stage facilitate the filtering of data within the network. As such, these predefined attributes are crucial to the success of your NetInjector deployment.
These attributes are essential to filtering content, whether you are returning simple text messages or developing rich content:
- Attribute filters enable you to create richly detailed content without building a finely-tuned subject hierarchy.
- Attribute filters facilitate rapid publication of content to narrowly-defined audiences.
Predefined attributes may be accessed by the application developer by name or position. Each of these parameters, as well as data type, must be entered when the channel is committed to the database.
The administrator and application designer should work closely together to create these predefined attributes for channels.
Note: If the application developer would like to create attributes unique to a particular subject within the channel, the developer should create discretionary attributes.
Here are a few predefined attributes for our Hobby channel:
- material
- experience level
- craft
- message
The data type for each of these attributes may vary, depending on how the developer needs to call them in the application itself.
Create an attribute
Each channel must have attributes. All of the subjects and subcategories for a channel share the same attributes.
Each attribute must have these three values:
- Name —
- the name of the attribute
- Position —
- the array position of the attribute
- Type —
- the data type
To create attributes for a channel:
- Enter an attribute Name.
- Enter an attribute Position.
-
Note: Number attributes consecutively, beginning with 1.
- Select the attribute's data Type from the select list.
-
Note: You may select any of the first seven types in the list.
- Click Set to assign the attribute to the channel.
- Click Commit to update the channel.
|